
Products You May Like
We independently select these products—if you buy from one of our links, we may earn a commission.
When I told my husband and sons (15-year-old twin carnivores) that I would be testing different ways of braising beef, they were elated. I don’t blame them. A good braise is a meat-lover’s dream — a comforting dish of tender, juicy, supremely beefy bliss.
Braising — simmering meat in a tightly covered pot in a small amount of liquid (not enough to cover the meat) — can go very right or, sadly, memorably wrong. I’m sure we’re all haunted by some past experience of a sawdust-dry pot roast requiring multiple glasses of milk, wine, or water to choke down. How can you avoid that type of result? Or, more importantly, how can you guarantee you’ll end up with the type of braise that makes you the hero of your family? To find out, I tested six popular braising methods to see which ones hold up and which ones fall flat.
A Few Notes About Methodology
Meat: I used chuck roasts for all of my testing. I purchased them all from the same store (Costco), and made sure they had the same best-by date and similar marbling. Following a tip given in the Simply Recipes stovetop method I tested, I removed each roast from the refrigerator an hour before I started cooking to take some of the chill off.
Methods: Each method is part of a full-on pot roast recipe that also includes vegetables and sometimes a sauce. I did not factor the vegetables or sauce into my ratings; those are based strictly on the meat.
Equipment: Some of these methods involve small appliances — Instant Pot, slow cooker, or sous vide circulator. For those that call for a Dutch oven, I used a 5-quart enamel-coated cast iron Dutch oven. You could also use a wider, shallower cast iron braiser if you don’t need to hold as much (they typically come in 3 1/2-quart size). Both types of pans are heavy, with a tight-fitting lid, which is what you want for braising.
Time: I’ve indicated the cook time, including any browning of the meat that happens before the braise. I did not include prep time because much of that involves preparing vegetables, which, for the purposes of this story, are beside the point. It’s all about the meat!
Ratings: Each method is ranked on a scale of 1 to 10, with 10 representing perfection. I had my husband and kids taste with me, as I appreciate their thoughts on meat — but the ratings are based on my experience and food expertise. The main factors affecting my ratings are texture of the meat, flavor of the meat, and ease (or difficulty) of the method for the home cook.
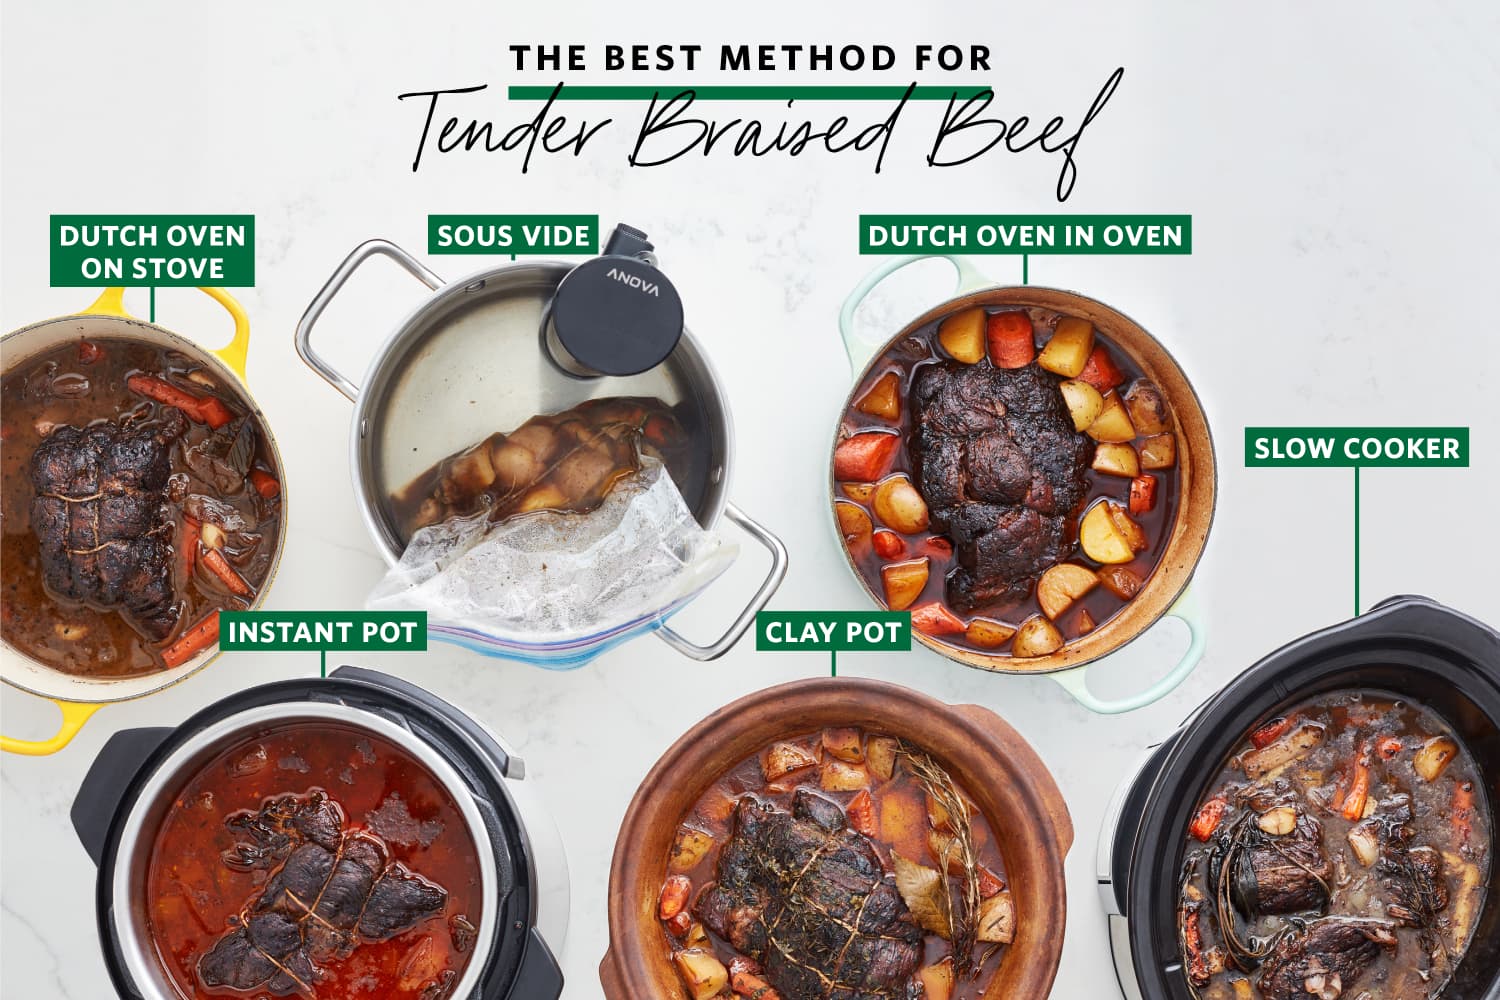
Braising Method: Sous Vide
About This Method: For this test, I went to the experts at Anova, a company that makes sous vide circulators, and followed a user recipe that is quite popular on their site. It’s a small-batch pot roast recipe, using 1 pound of chuck roast to serve 4 people. The roast is cut into 2-inch chunks, seasoned, and combined in a bag with chopped carrots and potatoes, some ice, rosemary, and Worcestershire sauce. The bag is lowered into a 170°F water bath, and the circulator is set to run for 24 hours. After that time, the beef chunks are removed from the bag, dried off, and seared in a skillet before serving.
Results: I happen to have a sous vide circulator and am interested in trying new ways to cook with it. This just didn’t seem like the right dish. The meat was a little dry and mushy, and it didn’t knock our socks off. There was very little effort or cleanup involved in this method, but the long cooking time (and having to plan a full day out) just didn’t seem worth it.
Braising Method: Slow Cooker
About This Method: The slow cooker pot roast recipe from the New York Times goes like this: Cut a 4-pound chuck roast into 3 chunks, season them, and brown each one on one side for five minutes in a skillet before placing in a slow cooker. Then brown some frozen pearl onions and garlic in the skillet; add red wine, water, and a splash of vinegar; and pour this mixture into the slow cooker with the beef and some herbs. Cover and cook on low for 4 hours, add some root vegetables, and cook an additional 4 to 5 hours. (I cooked mine for a total of 8 hours the lower end of the given time.) Thicken the sauce with an optional butter-flour mixture.
Results: Despite the recipe’s high ratings, my results were ho-hum. The roast was extremely tender, but it was also rather dry. And its flavor seemed muted, like all the beefiness seeped into the cooking liquid during the long simmer. The meat (even without the sauce) was overpowered by the flavor of the wine. I know that folks like the convenience of the slow cooker, but I feel like this method doesn’t do a good roast much justice.
Braising Method: Instant Pot
About This Method: I consulted Food Network and used their recipe for Instant Pot pot roast to test this method. It starts with seasoning and then deeply browning a 4-pound chuck roast using the Instant Pot’s sauté function. The roast comes out of the pot, and minced garlic and tomato paste go in, followed by flour to make a paste. Red wine is then added and cooked until slightly thickened, then broth, potatoes, carrots, celery, herbs, and the roast go in; halved onions go on top of the roast. You lock on the lid and set to cook on high pressure for 1 hour 15 minutes. After the cooking is complete, you quick-release pressure and allow the beef to sit in the pot, uncovered, for 10 minutes to “settle” before serving.
Results: This was definitely the quickest method, even with the long amount of time it took for the cooker to come to pressure. The roast was overall pretty good — a little dry in the very middle, but moist and tender around the edges. This is a solid, relatively fast method that would work for a weeknight, so it’s a good one to keep in your back pocket.
Braising Method: Dutch Oven on Stovetop
About This Method: I followed the instructions for the simply named Pot Roast on Simply Recipes. It begins with seasoning and browning a 3 1/2-pound chuck roast in a Dutch oven, then removing it from the pot. You then brown sliced onions and top them with garlic and carrots, then add the roast, a small amount of red wine, and a bay leaf. Then you cover the pot, bring the liquid to a simmer on the stovetop, and maintain a bare simmer for 3 1/2 to 4 1/2 hours (I went for 4 hours 15 minutes).
Results: The roast was a little dry on the very edges, but was wonderfully moist in the middle. It had a rich, browned-meat flavor that was not overwhelmed by wine or other flavorings. Texturally it retained a little bit of bite while still being quite tender (read: it did not turn to mush). The method did involve a fair amount of babysitting, though, because getting my stovetop (a new gas range) to hold a bare simmer proved harder than it should have been.
Braising Method: Dutch Oven in Oven
About This Method: I consulted a classic pot roast recipe from Martha Stewart for this test. It begins with seasoning and browning a 5-pound chuck roast in the Dutch oven, then adding beef stock, red wine, onions, and herbs to the pot. (Note: You’ll need a large Dutch oven to accommodate that size roast plus veggies.) The pot is covered and placed in a 350°F oven for 3 hours, at which point carrots and potatoes are added. The roast and vegetables cook for another hour.
Results: I loved the ease of just placing the pot in the oven, which maintains even, steady, all-over heat (not just heat on the bottom of the pot) with no effort on my part. The beef from this braise was moist with a rich, meaty flavor, and it was buttery-tender. And even though the vegetables did not factor into my rating, I simply must tell you that they were perfectly cooked — just tender, nowhere near mushy.
Braising Method: Clay Pot
About This Method: For this test, I used a 3.1-quart Römertopf clay baker, a rectangular dish with lid made from raw German clay. Around $70 these cooking vessels have been popular since Roman times and are beloved for roasting things like whole chickens and vegetables without any additional fat. I used the recipe for beef pot roast with red wine gravy from the blog Akkermans’ Eat-In, which was the only recipe I could find for beef braised in a clay pot; the blog says the recipe originally came from Römertopf’s website. The recipe starts by having you arrange celery, onion, garlic, and bay leaves in the bottom of the clay baker, then placing a 3- to 4-pound roast (I used a 3 1/2-pound one) on top and surrounding it with carrots and potatoes. You then season the beef with spices and herbs, mix 1 cup red wine with a little tomato paste, and pour the liquid over the roast. Then you cover with the lid, place the pot in the cold oven, turn the oven to 425°F, and cook for 1 1/2 to 2 1/4 hours (I went the full time).
Results: My initial thought was that this recipe had everything going against it: You don’t brown the meat, and it cooks at a moderately high temperature for a relatively short amount of time, instead of the low, slow simmer I was more accustomed to. Well, chalk it up to the magic of the clay pot, but this braise was outstanding. My husband and kids said it was far and above better than any of the other roasts we’d tried, and I had to agree. The texture wasn’t exactly buttery soft; we had to slice it with a knife or dig in with the tongs. But each bite was perfectly tender in the mouth, just with a little hint of bounce. The roast was incredibly moist all over, with a wonderfully concentrated beefiness that was unlike any of the other roasts we’d tried, which seemed to have had some of their beefiness leached out. It was almost the quickest, and definitely the most fuss-free, method — and it was the overwhelming favorite.
Clay pot cooking isn’t for everyone, of course, but it’s an ancient form of cooking that I’ve just now discovered for myself. If you have a Römertopf, you simply must use it for your next pot roast. I was quite impressed with how it cooked the beef, and even my kids raised their eyebrows in surprised delight when they tasted that roast. Dutch oven (or braiser) methods — either oven or stovetop — produce knockout results, too, and when you’re short on time the Instant Pot is a great option.